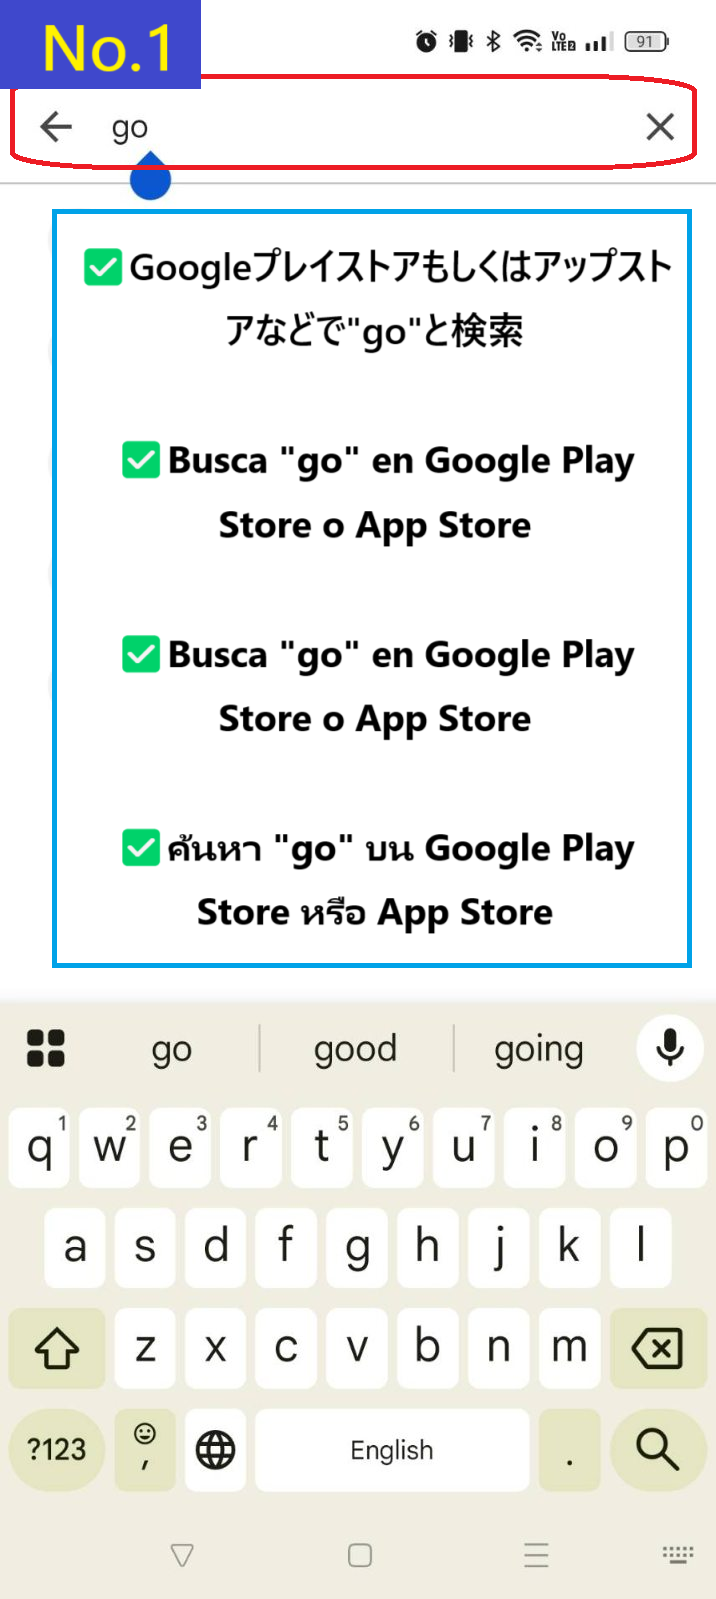
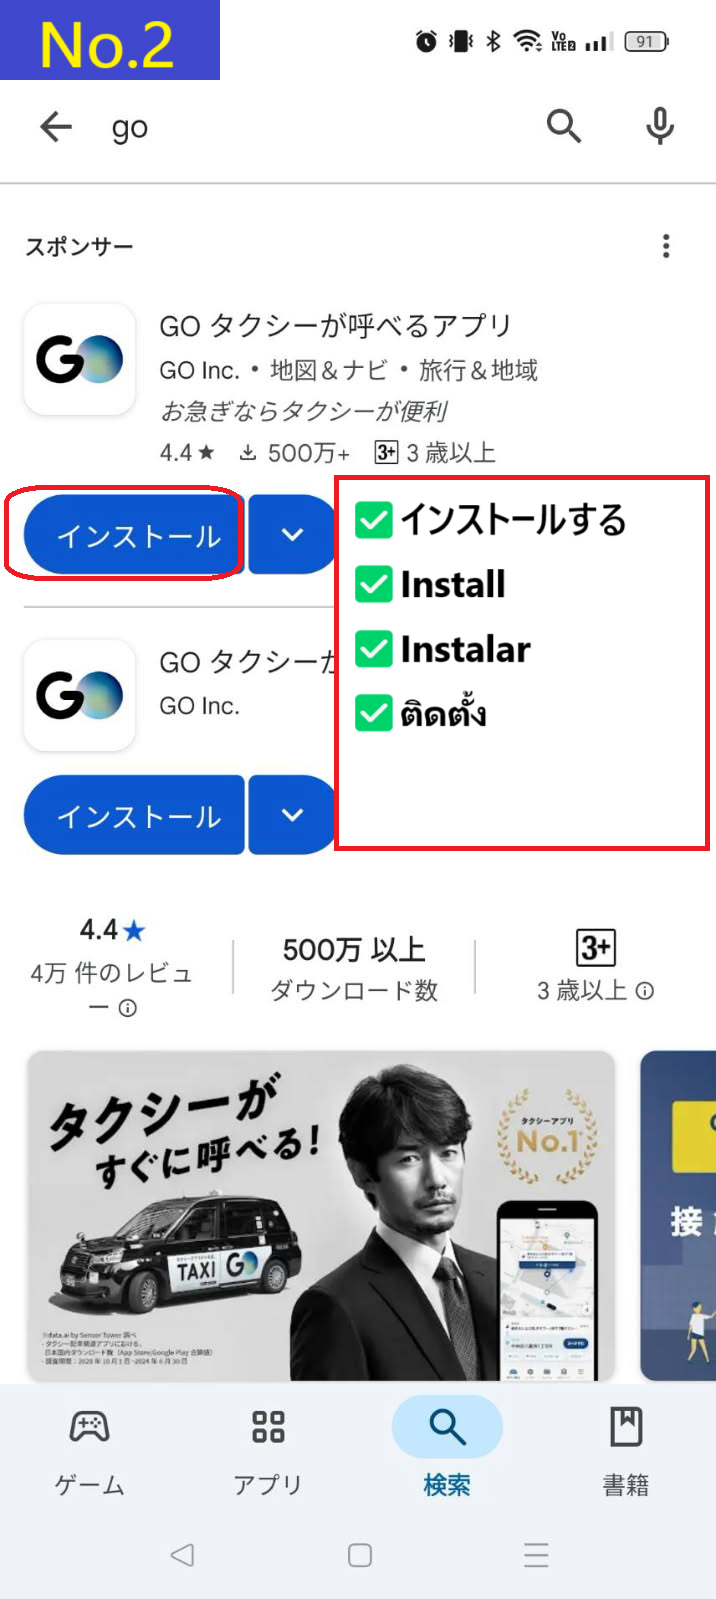
The GO app is a user-friendly taxi-hailing app that lets you book a taxi via smartphone. It's highly recommended for travelers visiting Japan.
Whether you're at the airport, hotel, or tourist spots, this app allows smooth transportation—even without speaking Japanese.
✅ Travelers going to places where public transport is inconvenient
✅ People carrying heavy luggage
✅ Anyone looking for safe and reliable transportation
You can register a credit card or use PayPay for cashless payment via GoPay.
* If you pay with GoPay, a paper receipt will not be issued upon arrival.
✅ Tap the top-left of the home screen
↓
✅ Tap ☰ menu
↓
✅ Check Ride History & Receipt Issuance
You can download your receipt from there.
You can pre-set your pick-up and drop-off points using the in-app map.
No need to search for a taxi at the hotel or station (*see note below)
Estimated arrival time and car type are shown in advance.

In the GO app, your name must be entered in Japanese hiragana.
If you would like to convert your English name, please use this tool.


If you have a coupon, please note the following:
Coupons usually expire in about 2 weeks, so it's best to install the app just before you plan to use it.
Coupons are only valid with GoPay (credit card payment within the app).
When requesting a ride, choose GoPay and apply the coupon before pressing the ride request button.
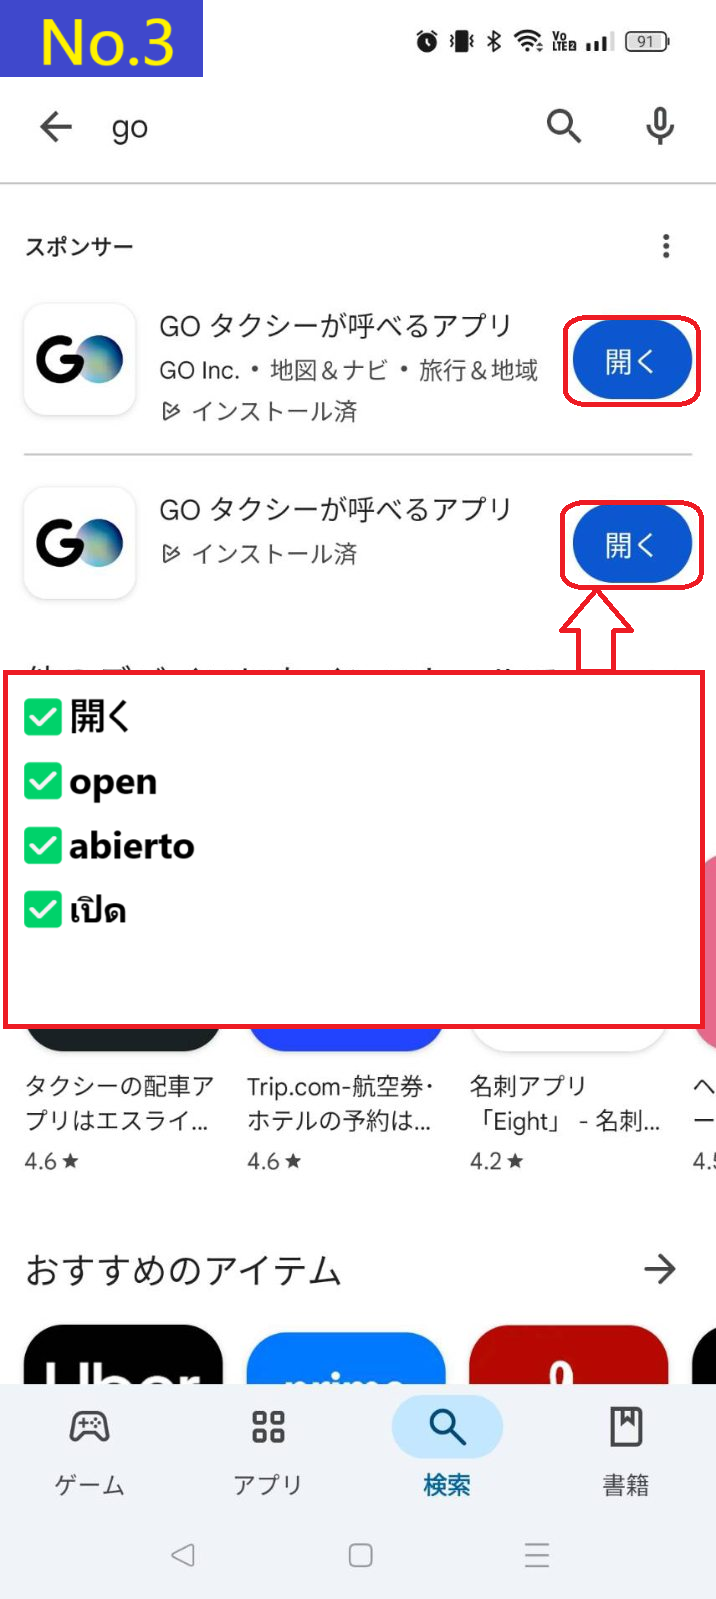
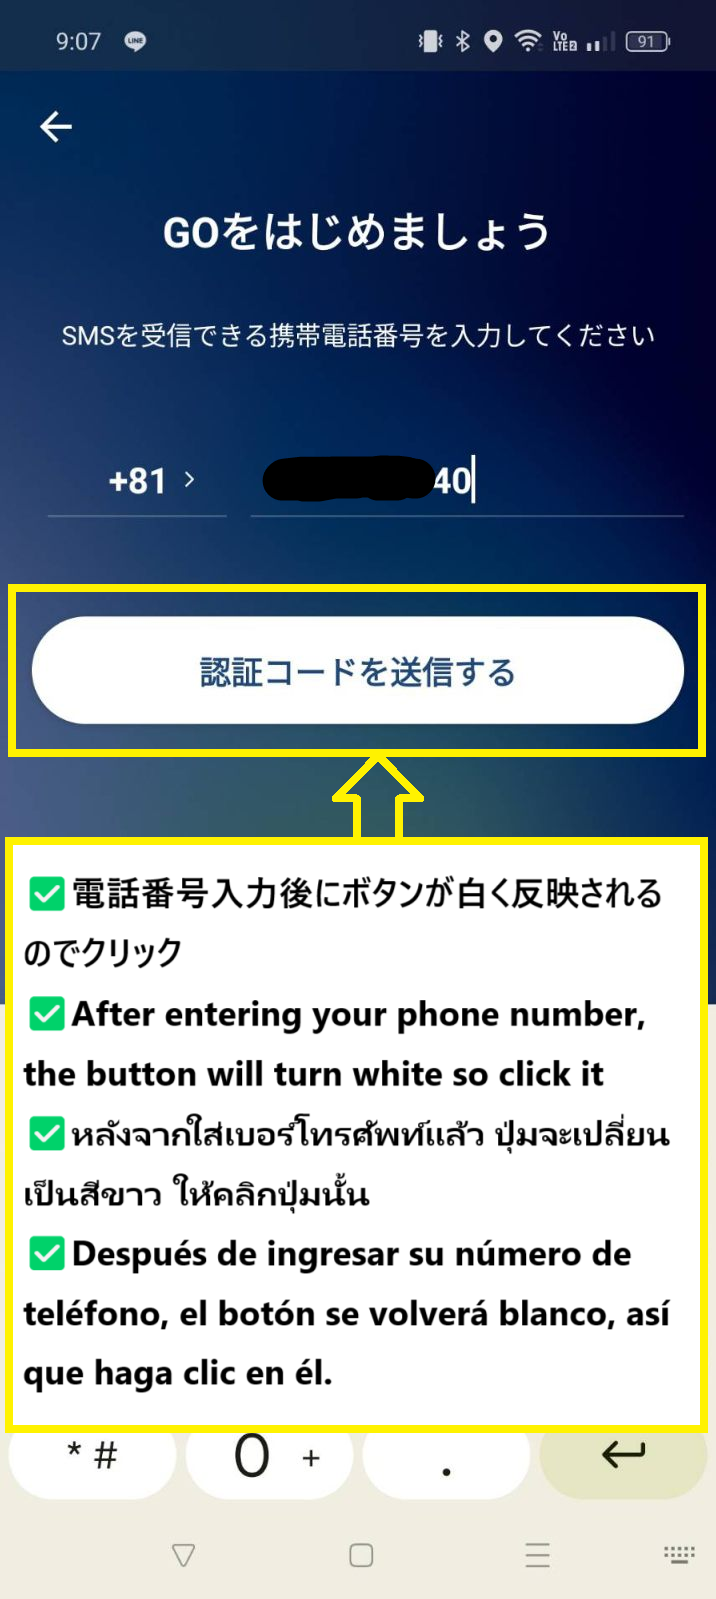
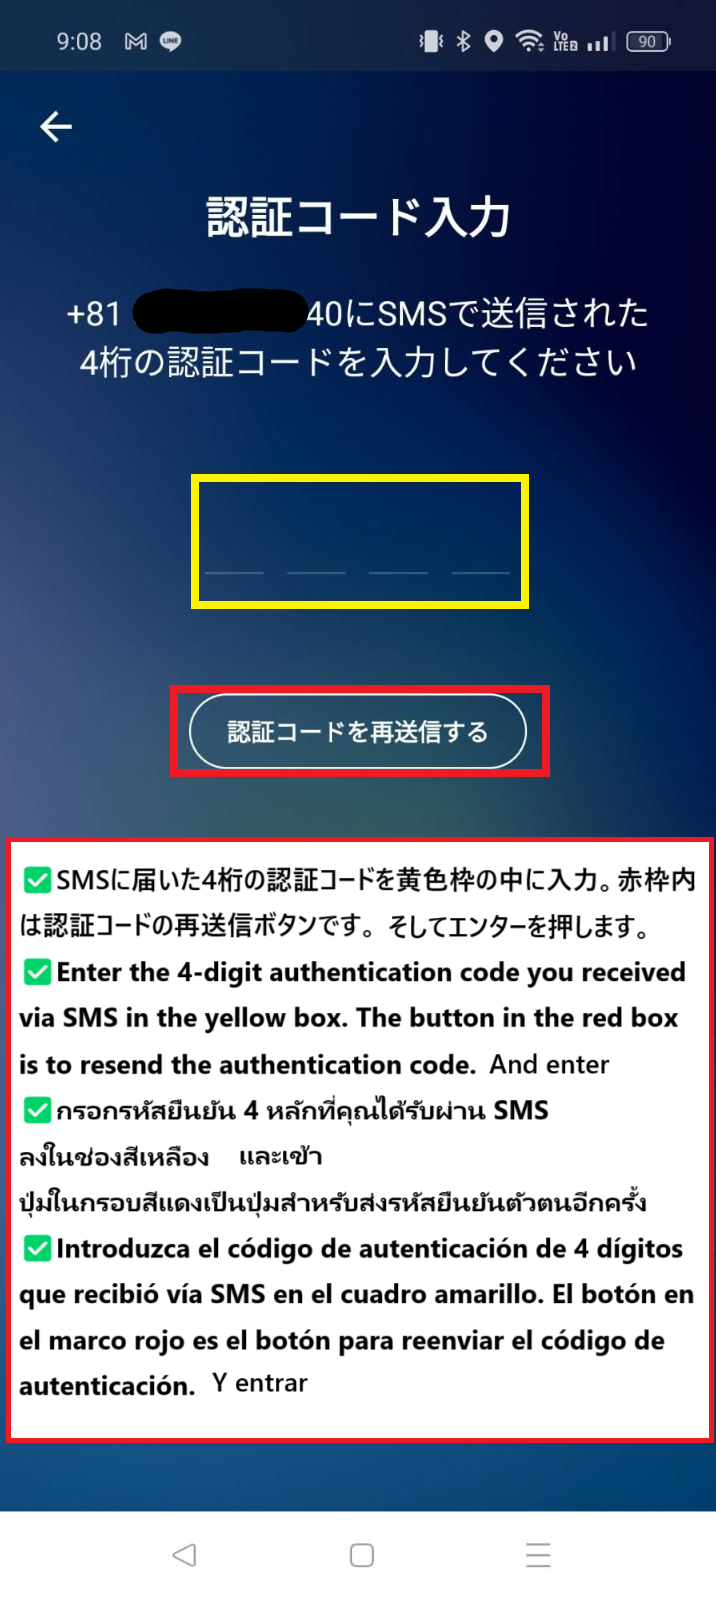
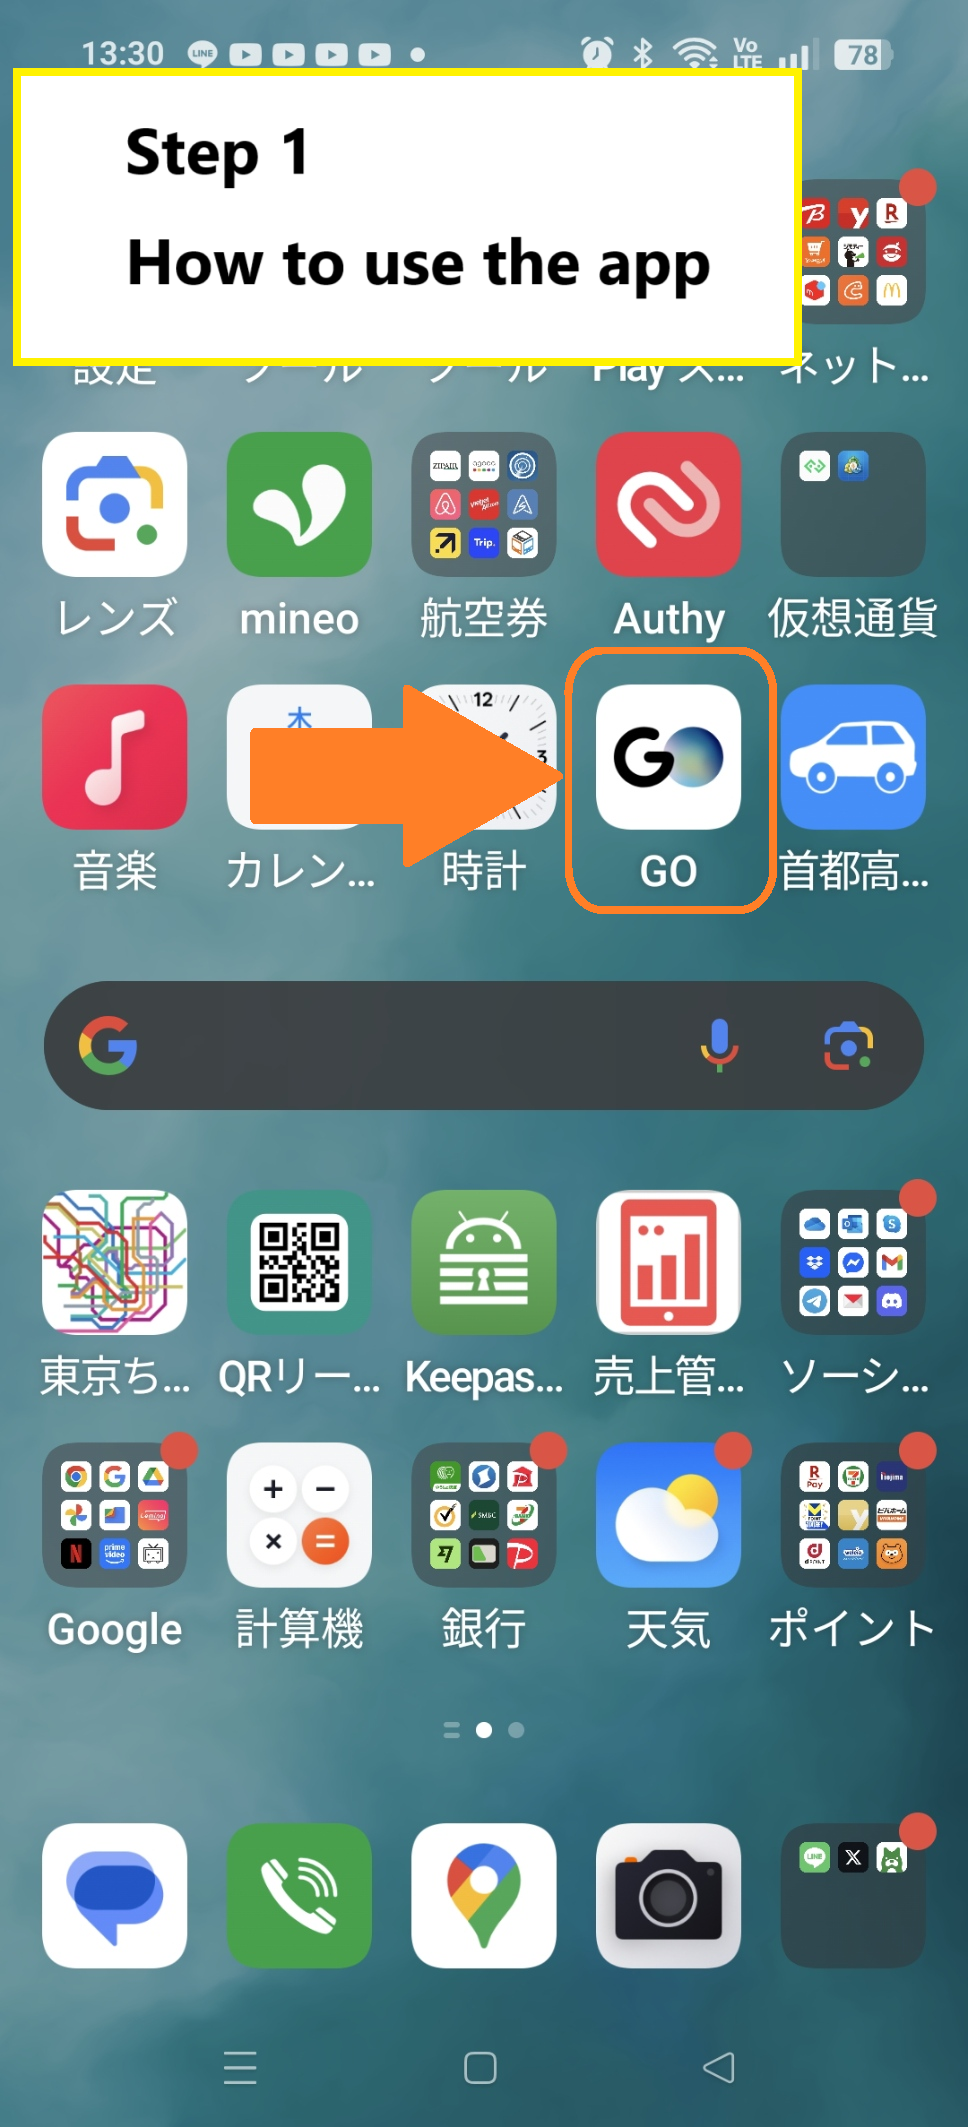
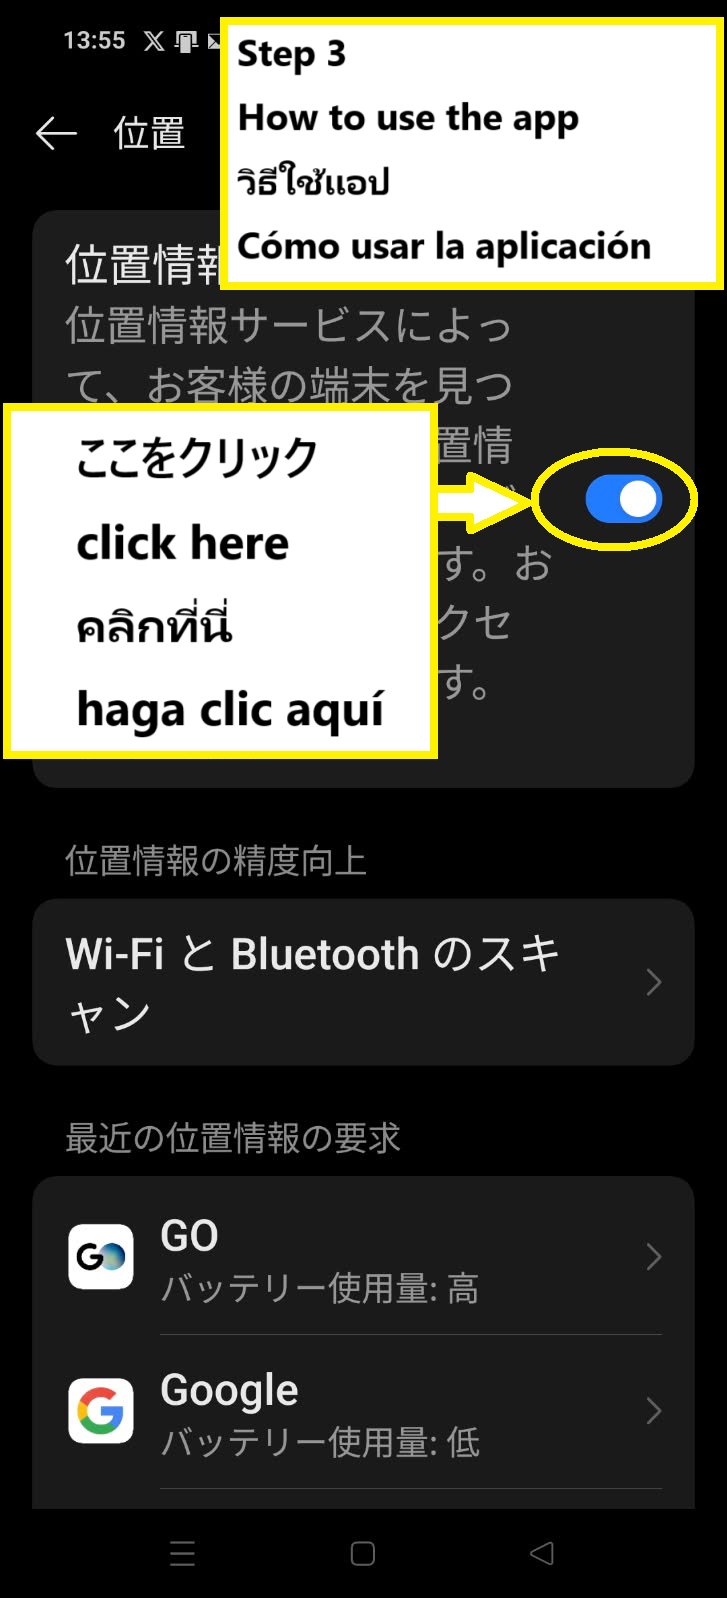
First, tap the GO app icon on your smartphone's home screen.
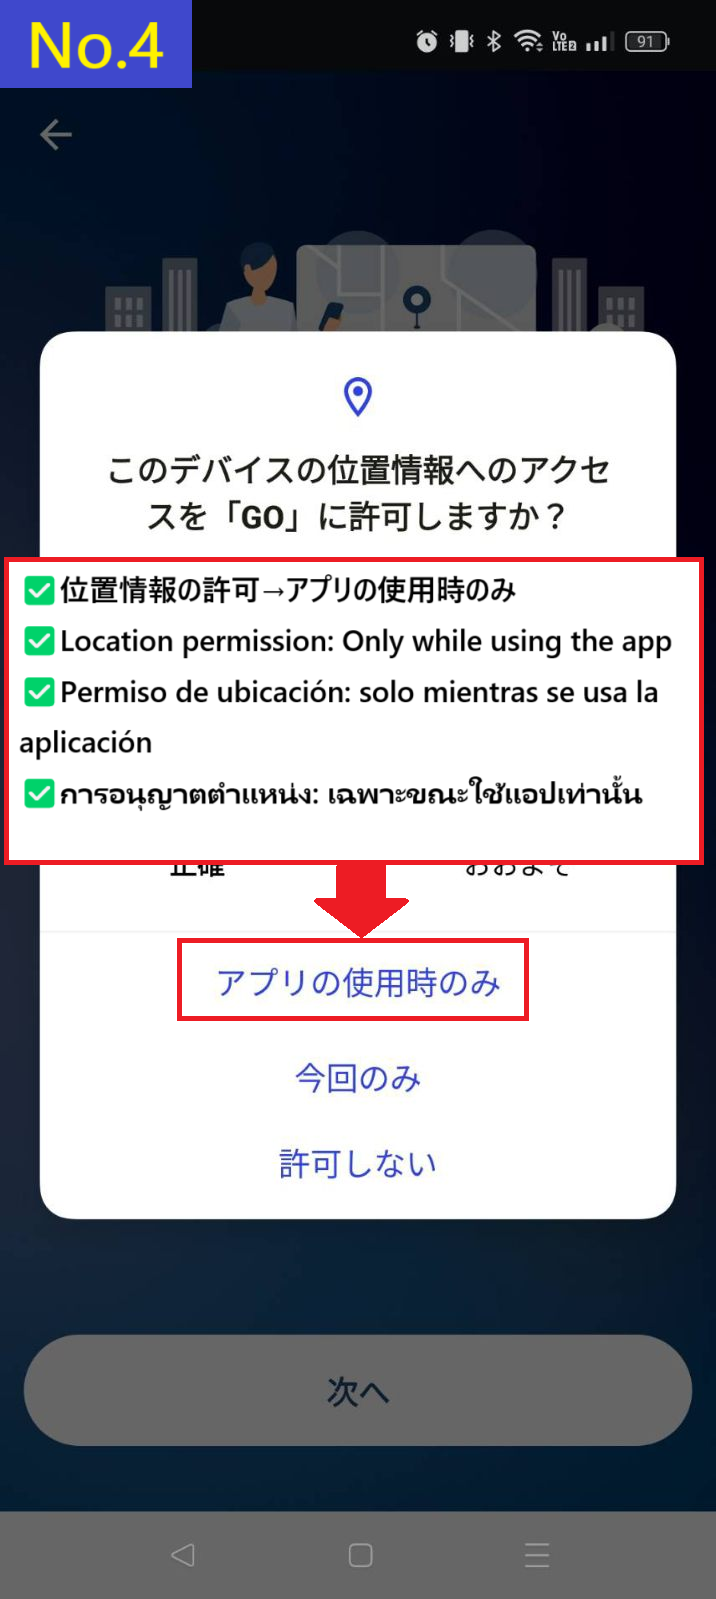
If you see a message like the one inside the red box at the top of the sample image, your smartphone’s location services are turned off.
Tap the “Settings” button on the right to go to the location settings screen.
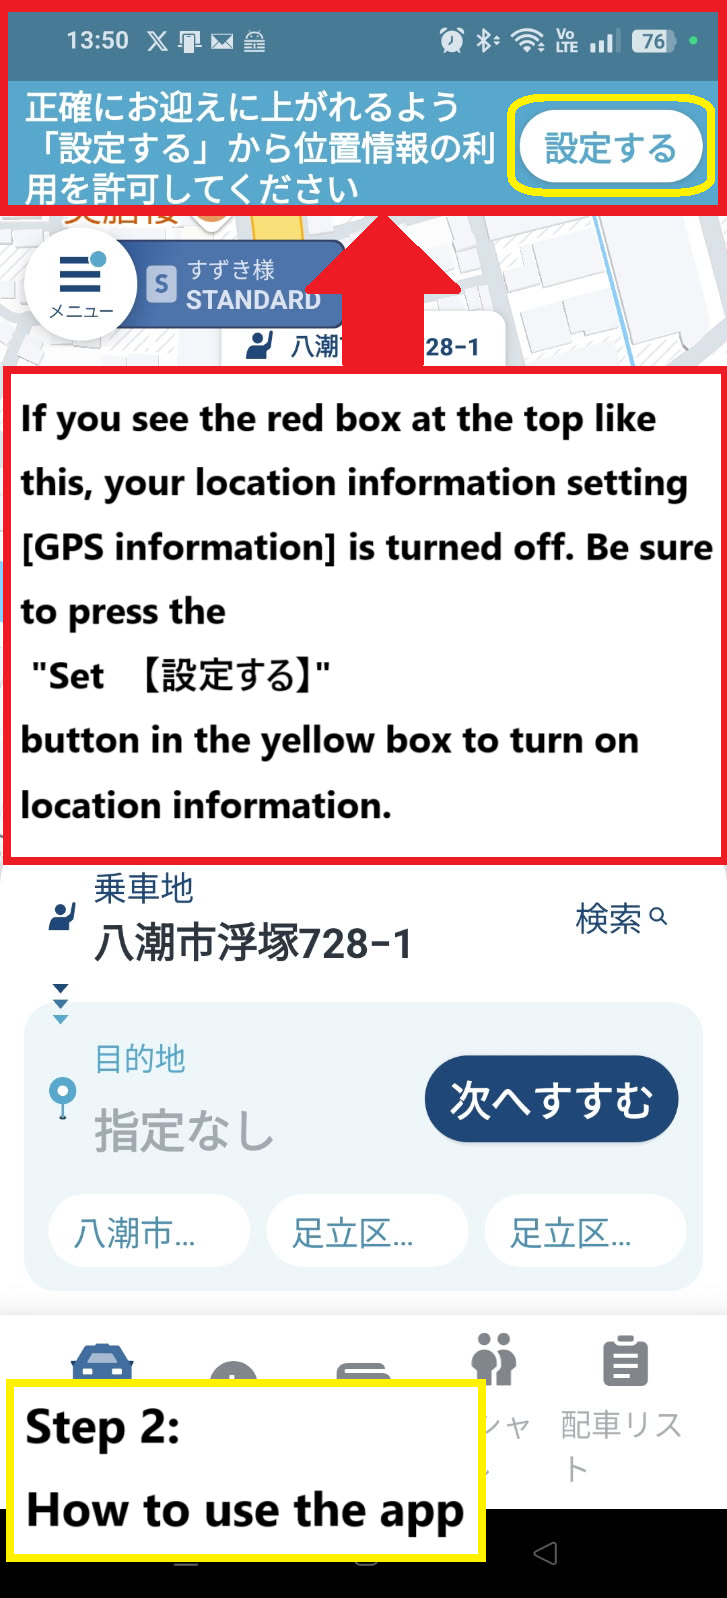
Toggle the location switch to ON. (When ON, the switch will turn blue.)
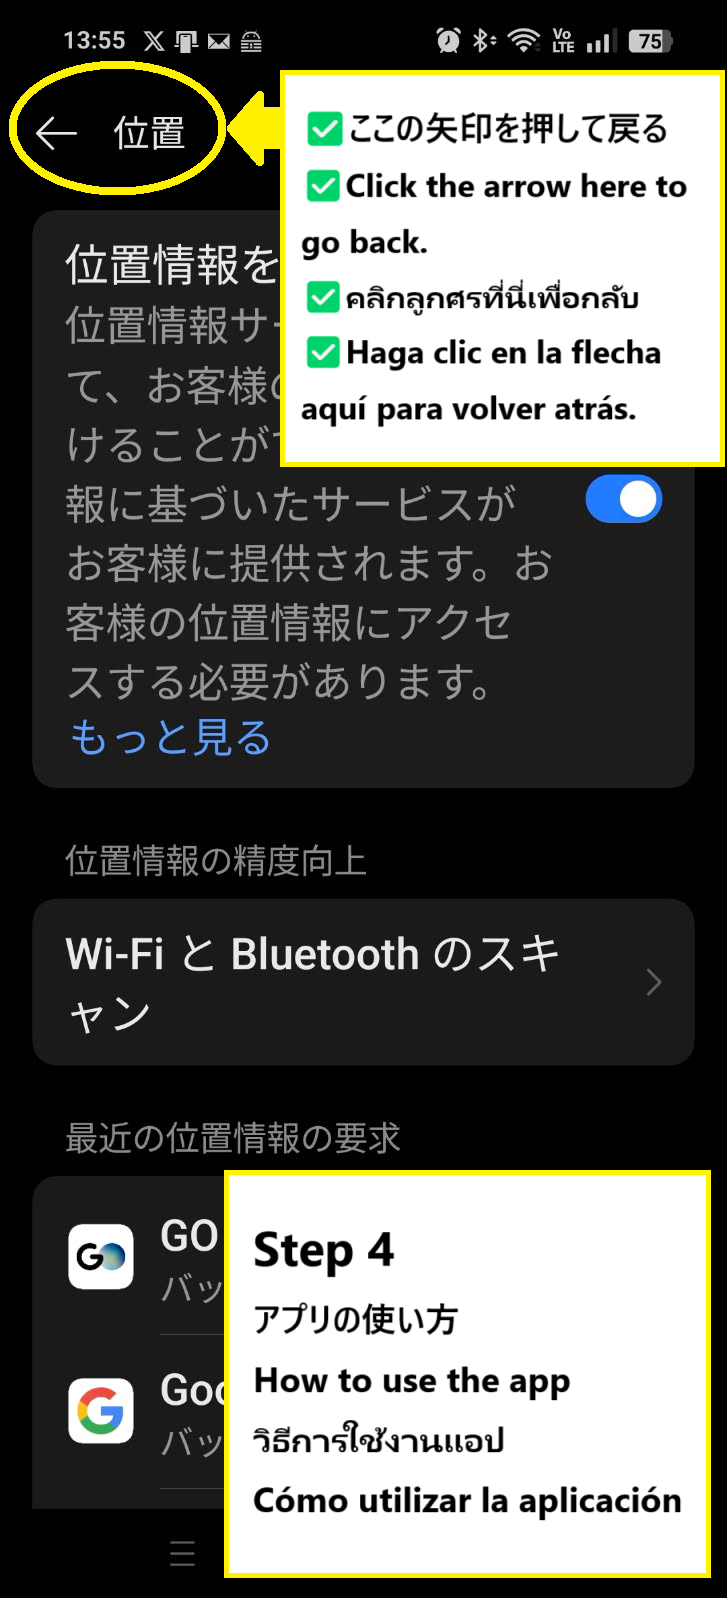
Once it's turned on, tap the ← icon in the upper left to return to the GO app.
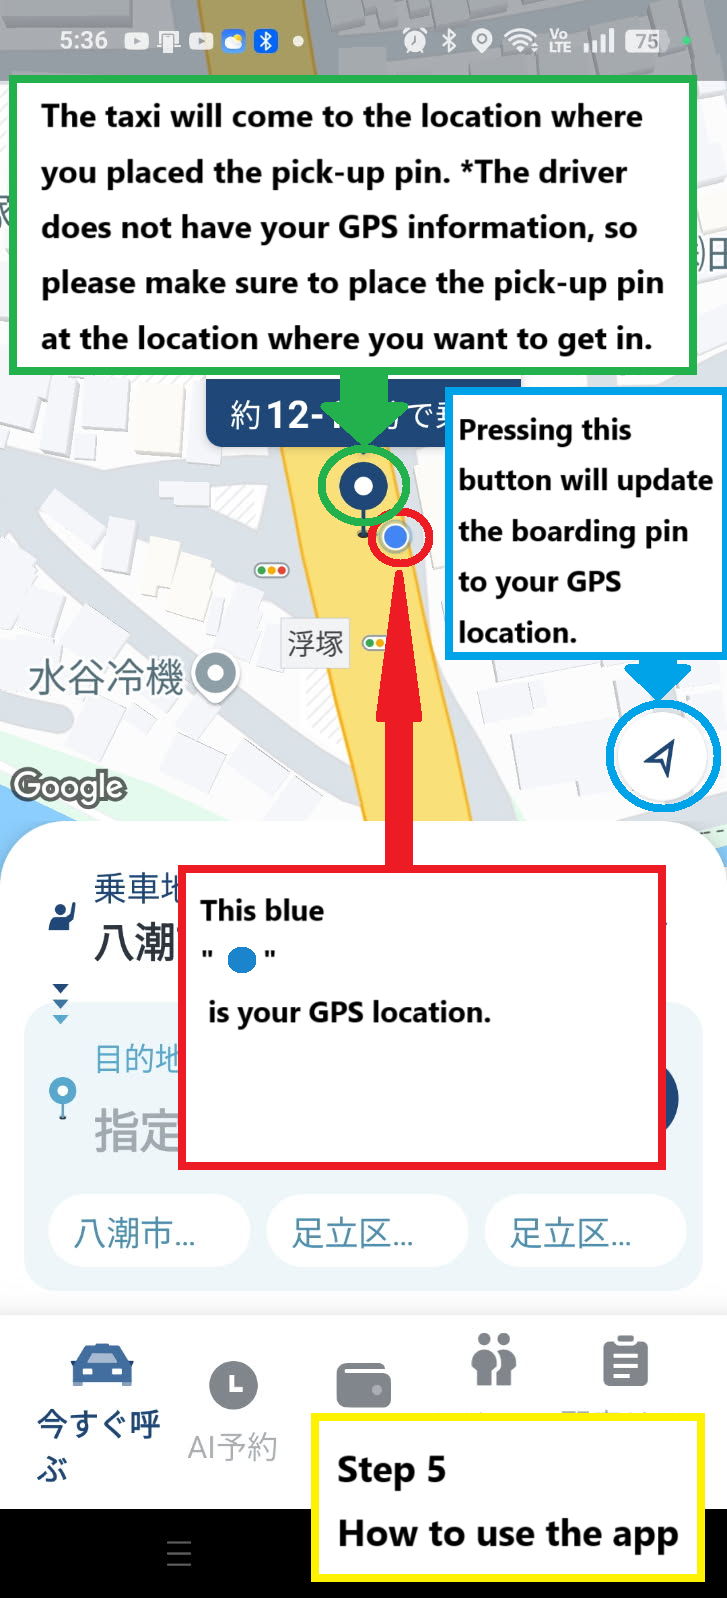
This is the home screen. Let us explain some important things to know before using the app.
The blue pin pointed by the green arrow ↡ is the spot where the taxi will arrive. Be sure to place it exactly where you want to be picked up.
The blue circle pointed by the red arrow ↑ shows your current GPS location.
The triangle button inside the blue circle indicated by the blue arrow ↡ is the button to call a taxi to your current GPS location. Be sure to tap it before proceeding to the next step.
※※※ This app does not automatically set your pickup location. You must tap the triangle button indicated by the blue arrow ↡ to set it. ※※※
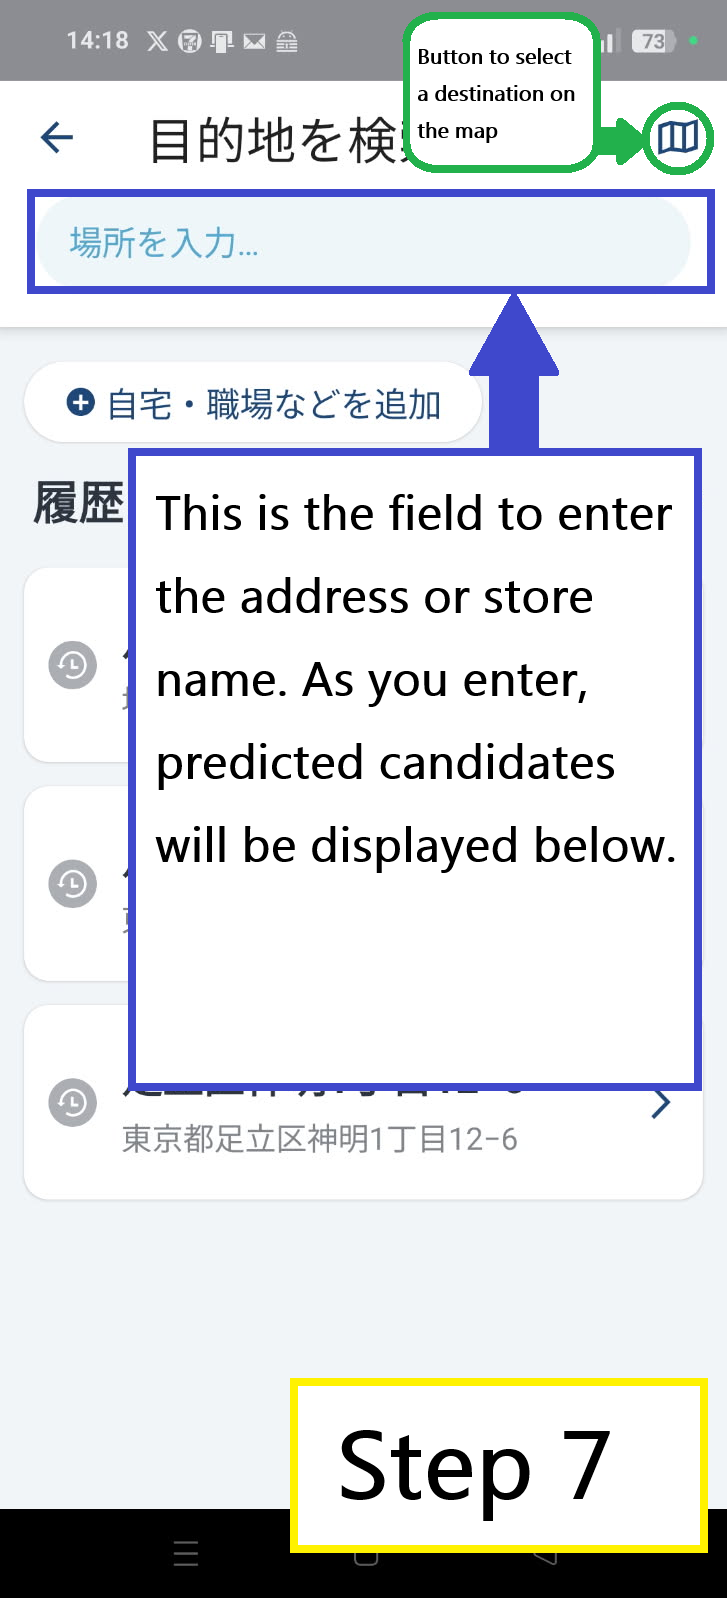
Tap the area indicated by the green arrow to go to the destination input screen. Also, check the red circle area.
The blue GPS dot is aligned with the pickup pin, so you're ready to request a ride from the correct location.
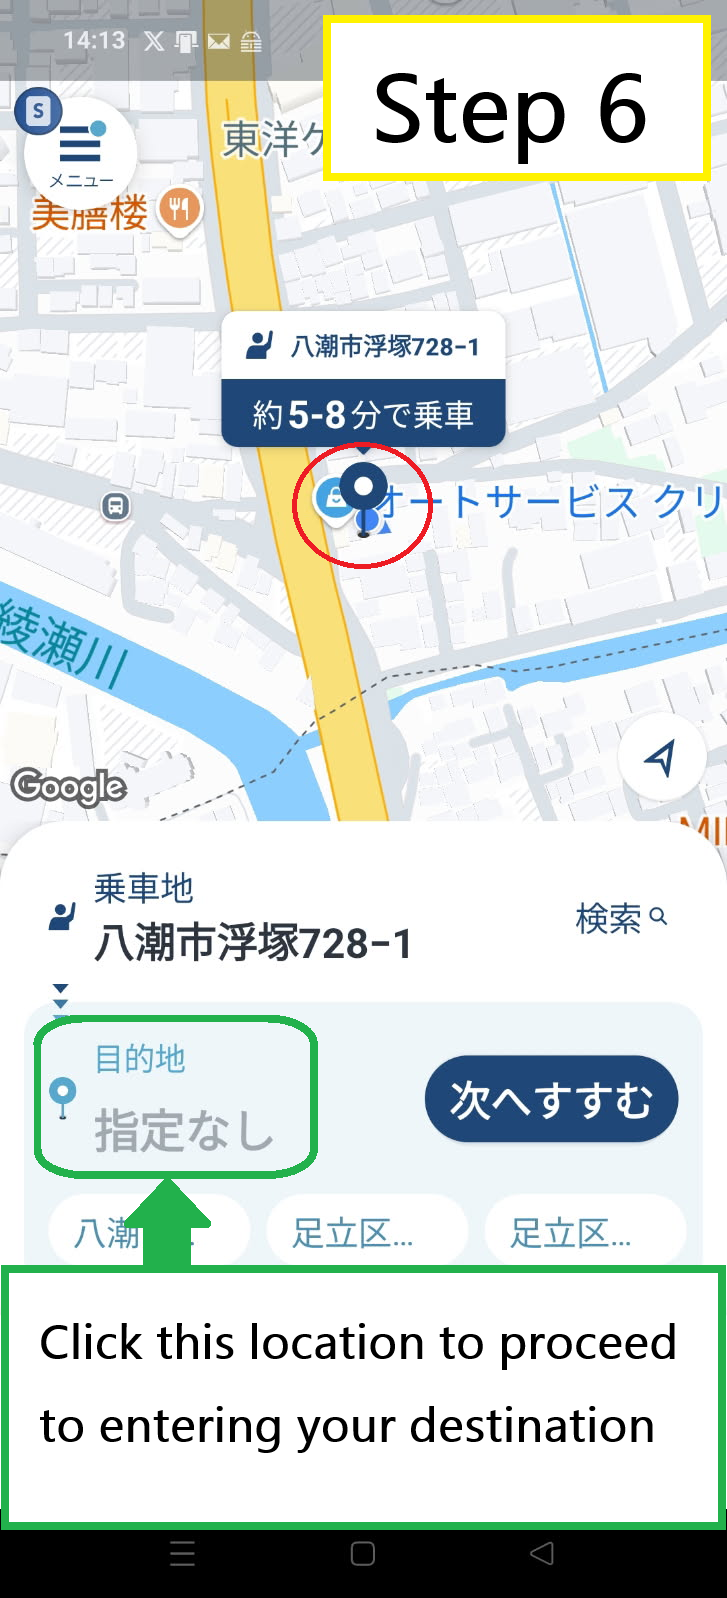
The button inside the green circle at the top right lets you choose your destination by dropping a pin on the map.
The area outlined in blue is where you can enter an address or store name for your destination.
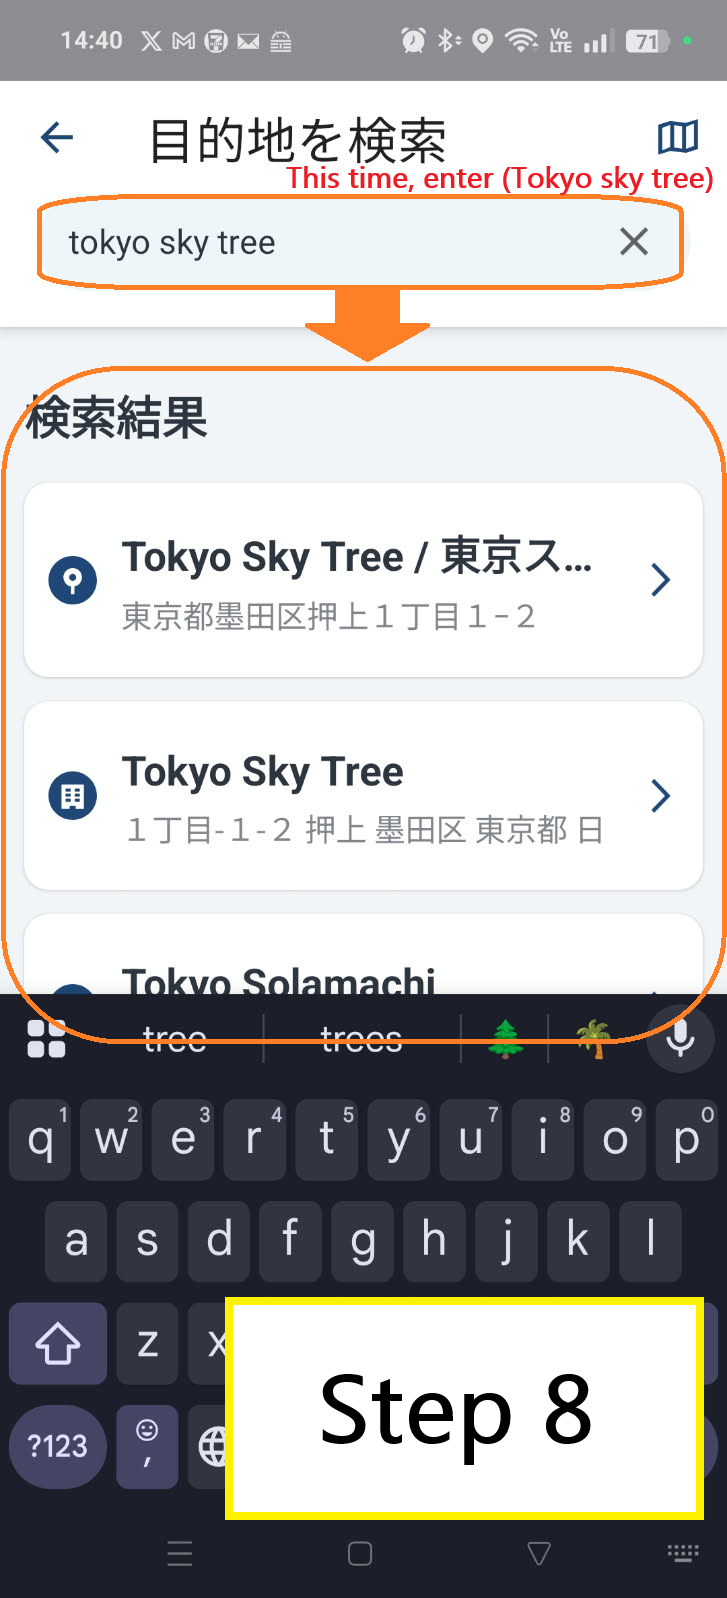
Here’s an example where “tokyo sky tree” has been typed in.
Below the search box, the following suggestions appear as search results:
Tokyo Sky Tree/東京ス...
Tokyo Sky tree
Tokyo Solamachi
In this case, all three results happen to have the same address, so selecting any of them is fine.
However, when searching for destinations like “7-Eleven,” there are usually multiple locations in the same area. If you don’t carefully confirm the search result, you might select the wrong store or address.
Please make sure to confirm the correct destination before proceeding.
※ The same applies when searching for pickup locations by address or store name. It's strongly recommended to use the triangle button at the bottom right of the map to set your pickup point.
The destination pin will appear inside the red circle.
Please double-check that this is the correct destination location.
A common mistake is when zooming out the map to view a wider area, the pin may unintentionally shift far from the desired location. People often don’t notice and accidentally confirm the wrong spot. Please be careful of this.
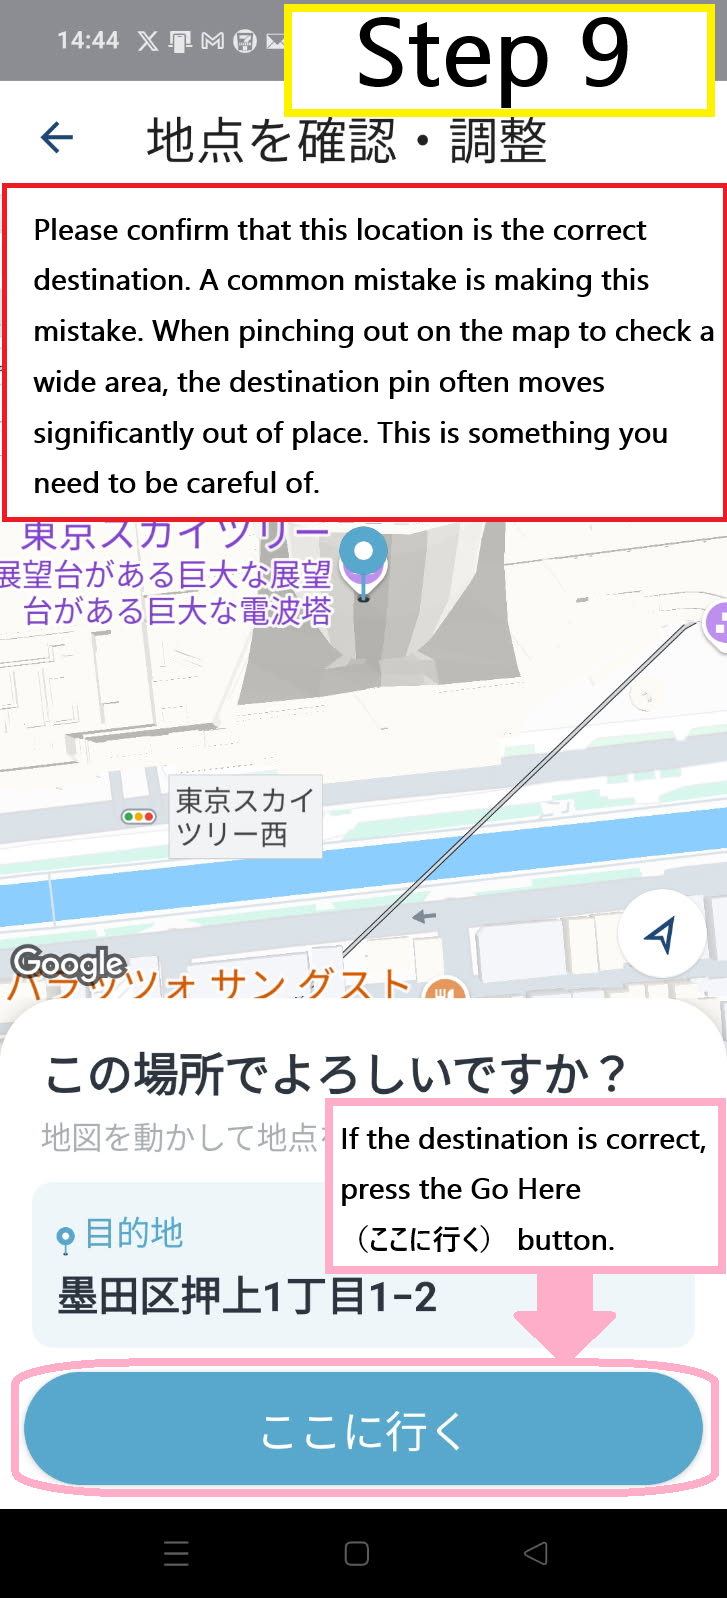
Check that the correct destination address is shown in the yellow box, then tap the blue “Next” button to proceed.
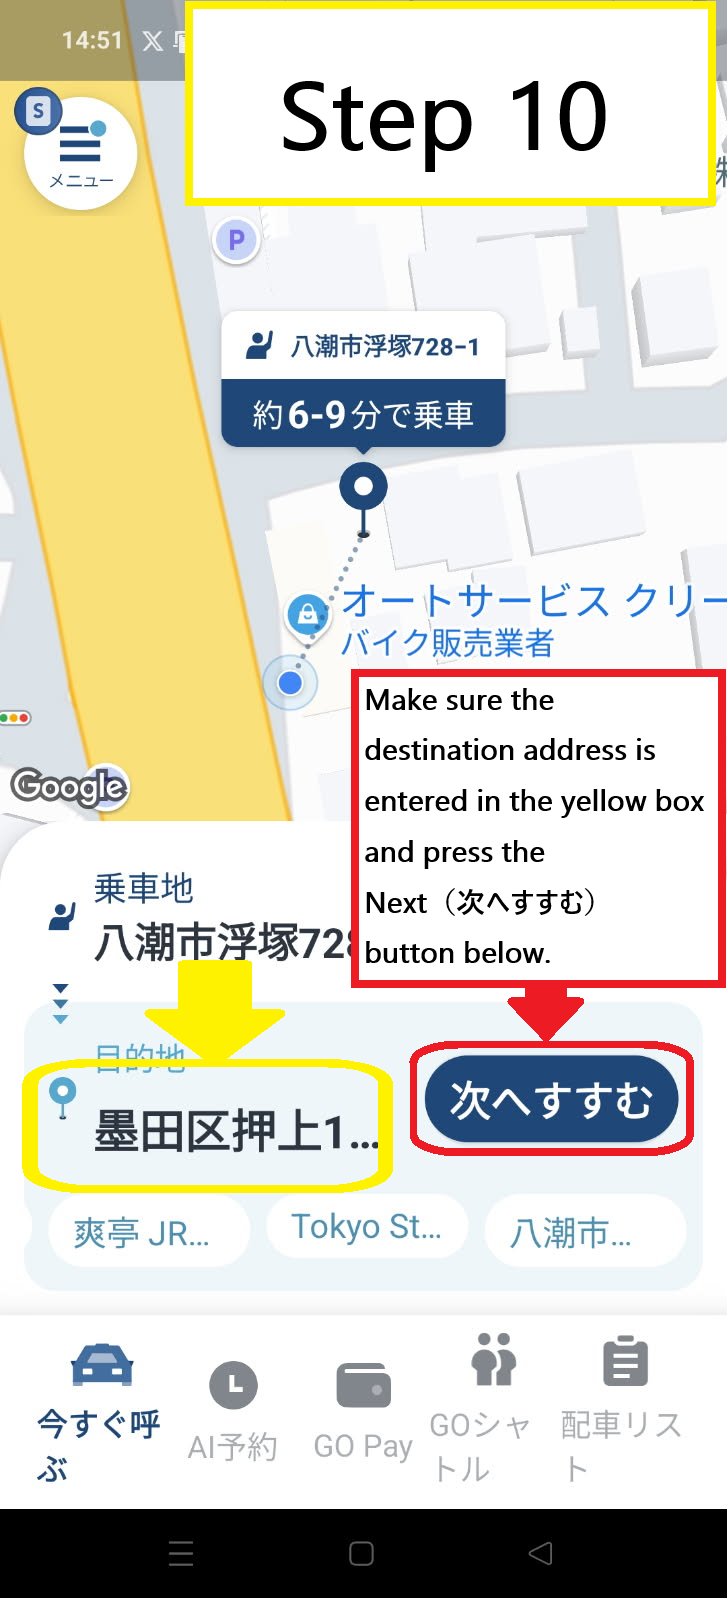
The pink box shows your pickup location.
The red box (hidden in this image) shows the destination pin and estimated ride time.
The green box takes you to a screen where you can select a specific taxi company or vehicle type if desired.
The orange box lets you choose your payment method: either “Pay in Car” (cash or other payment upon arrival), or “GoPay” (in-app payment using a registered credit card or QR payment like PayPay).
※ If you want to use a discount coupon, you must choose “GoPay” as your payment method. Coupons cannot be applied with “Pay in Car.”
※ Also note: Even when using a coupon, the taxi meter won’t reflect the discount at drop-off. The discount is handled in the GO app. You can check it under “Ride History / Receipts” by tapping the ☰ menu at the top left of the home screen.
Once you’ve finished setting your preferences, tap the yellow “Call a Taxi” button to start searching for a car.

Your name (as registered in the app)
Gender (if registered)
Age range (e.g., 30s, if registered)
※ The location or address where you dropped the pin
※※ This is the most important detail. The driver can only see the location where you placed the pin. If you drop the pin in the wrong place by mistake, the driver won’t know—it’s your responsibility to set it correctly.
Your live GPS location
※ The driver cannot see your current GPS position. Even if you see the taxi approaching on the map, do not walk away from the pin location. Stay at the place you set the pin.
The destination address
Drop the pin accurately where you want to be picked up
Enter your destination correctly
When the taxi arrives, tell the driver your name (as registered in the app) or your reservation number. Alternatively, you can show your reservation screen in the GO app to confirm and board.
If you drop the pin in the wrong place, the taxi will go there.
This is why the driver won’t know your destination until just before arriving. They also won’t know which direction to face for pickup.
If you want a smooth pickup, think carefully about the direction you’ll be traveling and drop the pin precisely.
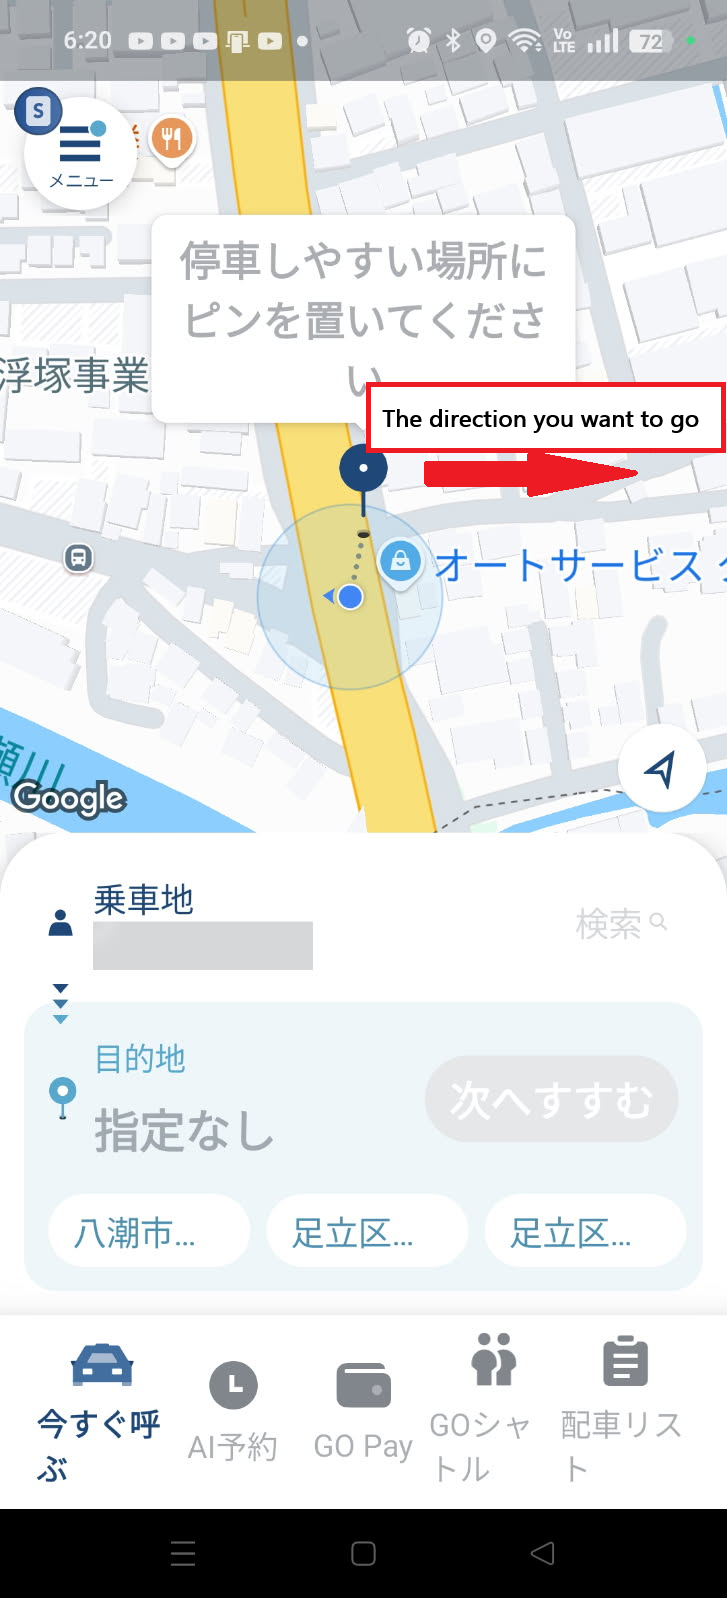
If you want to head in the direction of the red arrow in the image above, is the current pin position correct?
In Japan, vehicles drive on the left side. So the correct pin position is on the left side of your direction of travel.
You should avoid placing pins within 5 meters before or after intersections or crosswalks as stopping is prohibited there.
The image below shows the optimal pin position.

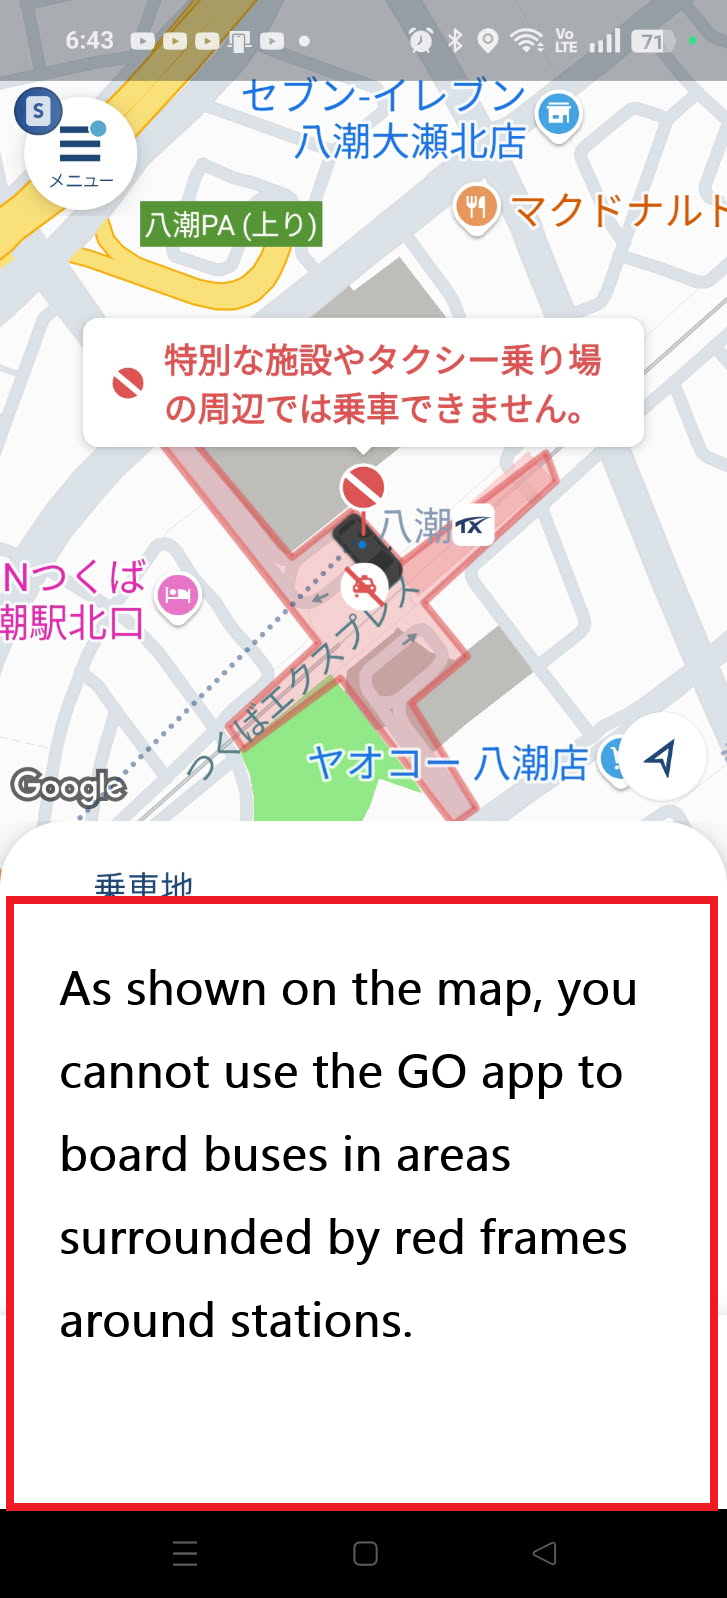
In the image above, the red box around the station indicates a no-pickup zone when using the GO app.
Because the pin was dropped in a restricted area, a warning message appears: “You cannot request a pickup near special facilities or taxi stands.”
Even if you slightly move the pin to the right and the app allows you to call a taxi, you should not do this. Here's why:
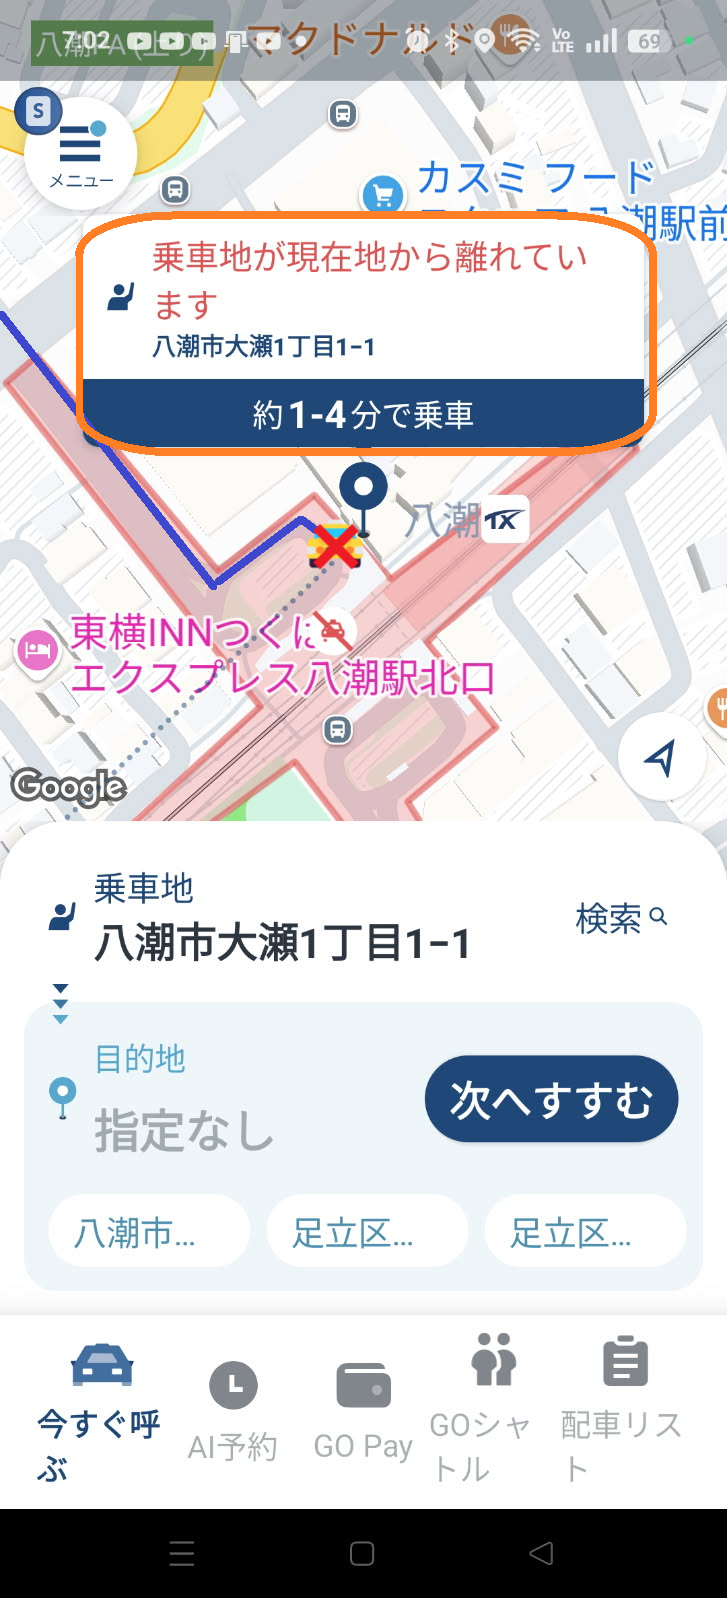
As shown above, moving the pin slightly out of the red area allows the app to accept the request.
However, navigation may still guide the driver into the station's rotary (restricted zone), causing the driver to cancel your ride even after it's been confirmed.
※ Most areas around stations are designated as no-pickup zones.
If you need to cancel a request after it's been made,
open the map screen in the app and tap the small circle icon with an “×” mark in the upper right corner to cancel.
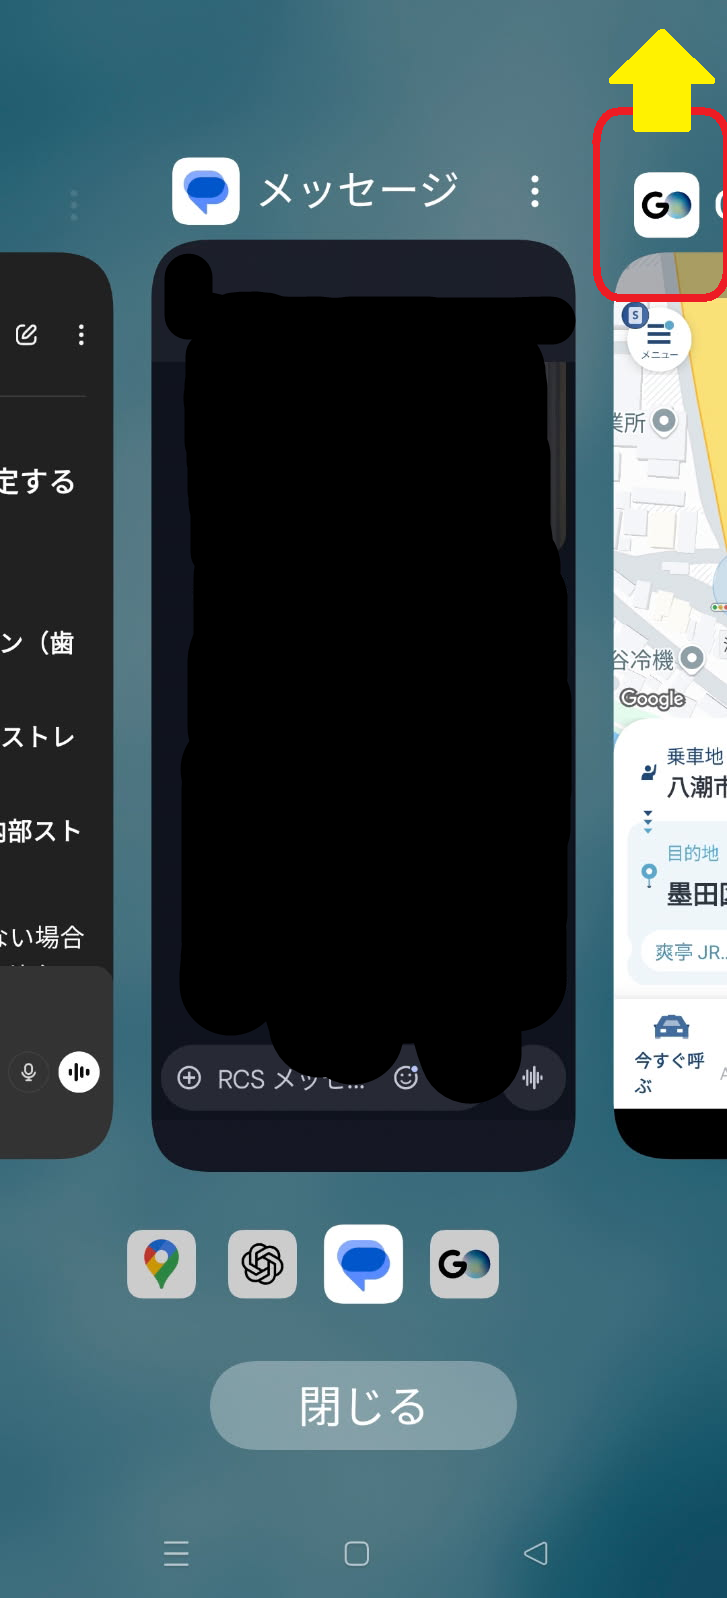
※ If your ride is canceled by the driver during the search process, the system will automatically begin looking for the next available taxi. Even if you close the app, it may continue searching in the background.
If you no longer wish to request a ride, swipe up the GO app from your screen to close it completely.
If no taxis are found, keep trying. It’s usually still faster than waiting in a long taxi line at the station.
Canceling a ride: On the map screen, tap the small ✖ button in the top right corner to cancel.
Cancellation fees: May apply if you cancel after a certain time (e.g., more than 3 minutes after confirmation). Details can be found in the app.
“GO” is a tool that makes travel and sightseeing in Japan more convenient. Try it to enjoy your trip more freely!